Adventures in 3D printing
Published on Sep 17, 2023
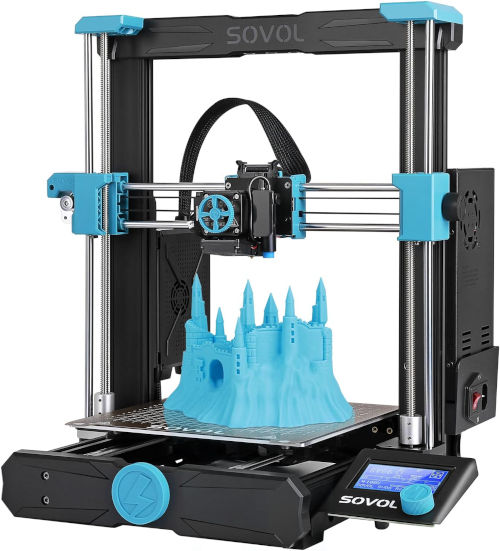
I’d been idly considering getting a 3D printer for a while, but have only recently taken the plunge. I picked up a Sovol SV06 from Amazon for £199.99[1], which is a model commonly recommended for beginners. About three weeks later, I think I’ve finally finished fixing all the problems the printer has, and thought I’d document them.
Setup and out of the box performance
The setup of the printer itself was straight forward. Most parts are assembled, you just have to bolt the frame together, bolt the various parts to the frame, and connect some wires. The hex bits in the iFixit Mako Bit Set were a godsend for this, as the included hex keys were a bit flimsy.
Once everything is bolted and connected, you turn it on and immediately start looking around for the jet engine you can hear. The fans are loud. The instructions walk you through the initial calibration, which consists of:
- Levelling the X-Axis gantry (where the print head moves). The printer does this by (gently) ramming the gantry up as far as it will go.
- Adjusting the Z-offset of the print head. The printer has an inductive proximity sensor attached to the extruder, but it doesn’t know how high it is relative to the nozzle. The calibration process involves manually dialing in this offset while moving a piece of paper back and forth under the nozzle.
- Levelling the bed. This is entirely automatic: the printer just probes a bunch of points on the bed with the proximity sensor and builds up a mesh it can use to compensate for the bed not being level.
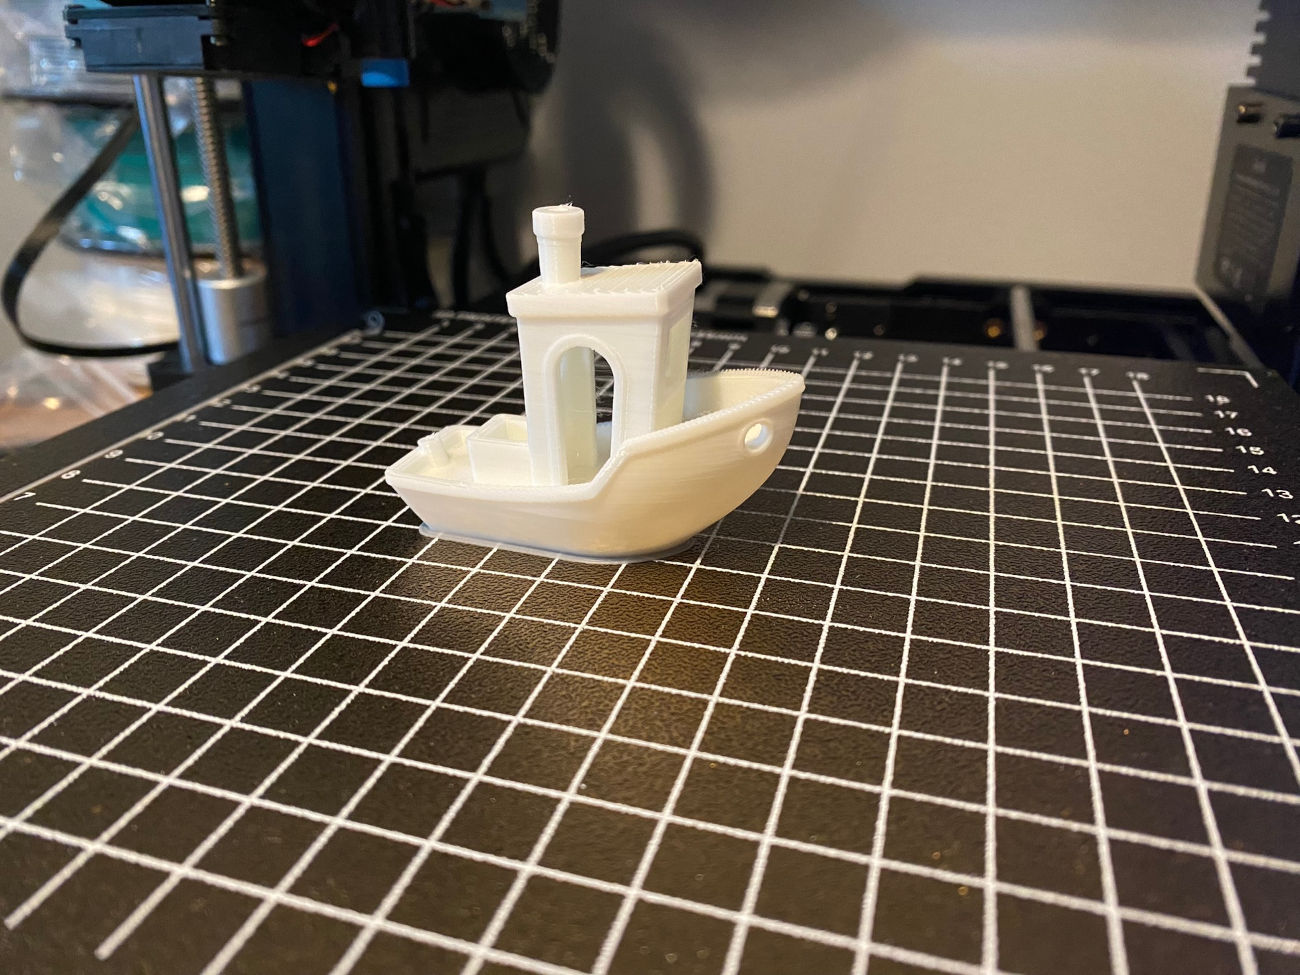
After that’s done, the included SD card has the standard “Benchy” model on it, pre-sliced and ready to print. It came out looking good:
The noise. Oh god, the noise.
I set about printing a few more things, but the noise of the machine quickly got to me. It sits approximately 80cm from my ear, and between the fans and the noises it makes when moving it was driving me mad. The fan in the PSU seems to sit at 100% power regardless of temperature or load, and sounds about three times louder than my laptop’s fans do when they’re running at full tilt. Fortunately, someone had designed a printable PSU fan silencer that redirects the airflow (and most of the noise) from the fan. It doesn’t feel like it should help that much, but it does significantly reduce the noise as it claims. This was the first of many times I’d use the 3D printer to print parts for itself.
The other noise was a lot less straightforward. The linear rods that all three axes run on pass through several bearings. Sovol apparently don’t bother to apply any lubrication to these, so it sounds like an elephant is moving through a gravel pit when the printer is running. Some people online suggest rubbing lube on the rods and pushing the movable parts back and forth, but this just results in a load of lube caught on the dust filters of the bearings[2].
The solution to this, then, was to dismantle most of the printer to gain access to each of the ten bearings, and manually lubricate them. This was tedious and messy, but not actually that difficult. It doesn’t seem like the kind of thing you should have to do on a brand-new machine, but I guess you get what you pay for.
Speeeeeeed
3D printers are slow. The SV06 is not one of the faster ones. One simple way to increase the print speed is to change out the nozzle. The SV06 comes with a 0.4mm nozzle, which is pretty standard, but if you upgrade to a 0.6mm nozzle you can extrude more than twice the volume of plastic in the same amount of time[3]. The consensus among anonymous internet people is that if you’re using a modern slicer there isn’t much difference in print quality when doing this.
I dutifully ordered a new nozzle, and after it turned up set about installing it. This is mostly straight forward, aside from the complication that you’re meant to do it when the hot-end is hot. That makes sense: you want it be under the same thermal expansion it will be under during use, but the tool they provide to change the nozzle is all metal. So you have a relatively delicate operation that you have to do in a bit of a rush before the heat creeps all the way up to your hand.
With the new nozzle in place, the printer was noticeably faster. I didn’t notice any difference in print quality, either.
SD cards are not fun
Up until this point, my process for printing anything was to slice it on the computer, export the gcode file to an SD card, turn around and walk over to the printer, insert the SD card, and start the print from the LCD. I don’t particularly mind those steps, but the SD card slot on the Sovol is terrible. It doesn’t line up well to the hole in the case, doesn’t guide the card in well, and is all round a pain to use.[4]
To remove the sneaker-net element of this process, I ordered a Raspberry Pi and installed OctoPrint on it. OctoPrint provides a web interface to the printer (which it controls over USB), and most slicers can automatically export the gcode to an OctoPrint instance.
While OctoPrint itself is great, there was one small problem: if you connect anything to the USB port on the printer, it tries to draw 5V from it and “backpower” itself. It’s not meant to draw power from the USB port, it’s just not designed well. A lot of the cheaper 3D printers share this flaw, it seems. The fix here is to get a power blocker such as the one made by PortaPow that simply leaves the +5V line unconnected between the two ends. Presumably Sovol could fix this by adding a diode to the USB power line, but maybe that would push their costs too high?
After getting OctoPrint working, I printed a nice case for it to mount on the side of the printer. I slotted the Pi in, and when I powered it on again it didn’t boot. When I went to pick it up to debug the problem, I burnt my finger on the SD card[5]. Apparently if you break SD cards in a certain way, they can short out and get very hot. Fun! Maybe I shouldn’t have been using the no-brand card that came with the printer…
What do we do with a drunken bed?
I continued printing bits and bobs, but was starting to notice a new issue: if I was printing multiple copies of the same object, those on the right hand side of the bed often failed. OctoPrint has a nifty plugin that lets you cancel certain regions from the build, which saves it ruining everything, but only being able to print in certain places was annoying.
I ran through all the troubleshooting steps I could think of, including a foray into custom firmware with different bed levelling abilities, but nothing seemed to help. Another OctoPrint plugin later and I could see the problem:
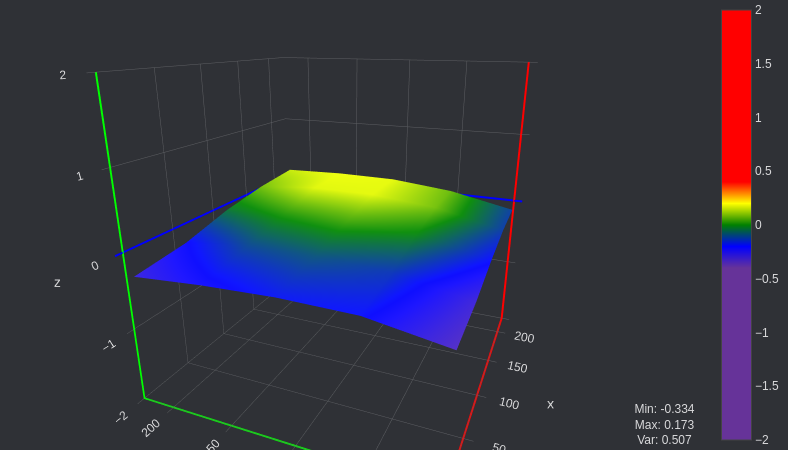
The orientation of the graphic is a bit confusing, but you can see how the right hand side of the bed is significantly higher than the left. There’s a total variance of just over 0.5mm, which is apparently enough to cause problems even with the auto bed levelling. I spoke to Sovol support, and eventually they suggested disassembling the print bed and measuring the aluminium spacers that hold the bed. Sure enough, they were all different heights:

There’s a 0.13mm variance in their heights, which doesn’t account for the 0.5mm seen in the bed mesh, but it’s a good starting point. Rather than go back and forth with Sovol support over the course of many days, I just ordered some nylock nuts and reinstalled the bed without spacers. The nuts hold the bed in place, while still allowing you to tighten or loosen the screws to adjust the height.
After five or six rounds of totally and utterly uneventful adjusting and re-leveling, I got to this point:
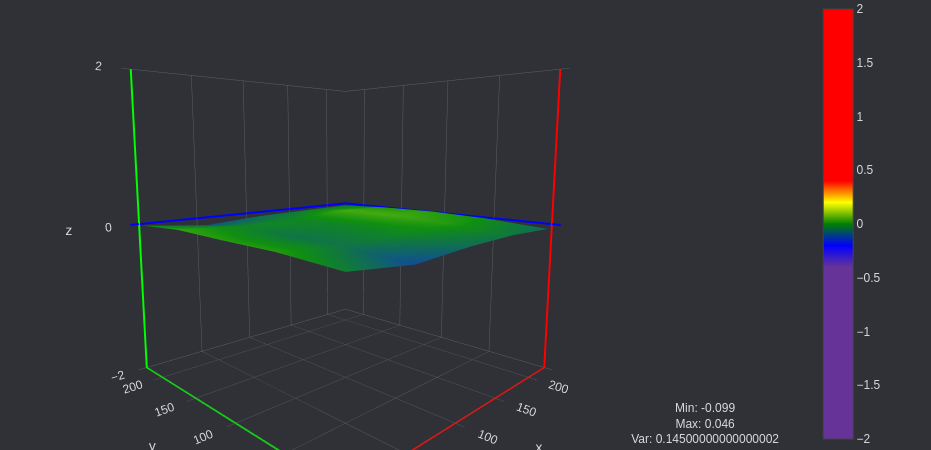
There’s only so much you can do when you only have five screws to adjust, but I’m pretty happy the variance is now under 0.15mm. That’s definitely in the “good enough” range that the bed leveling algorithm can compensate for.
Whoops
So, about that “totally and utterly uneventful adjusting” I did. To get at the screws that hold the bed in place, you have to remove the thin sheet that acts as the build surface. This attaches magnetically to the bed, so it’s easy to do, but I am lazy and decided to leave it off while I fiddled with the bed.
There’s a slight problem here, though: when it’s working out the bed mesh the printer uses the inductive proximity sensor. The inductive proximity sensor detects metal. The metal is in the removable sheet. The first time I tried to run the bed mesh, the printer rammed the extruder assembly into the bed at a decent speed and ended up at a rather nasty angle.
I checked over the extruder and found the heat break had bent:
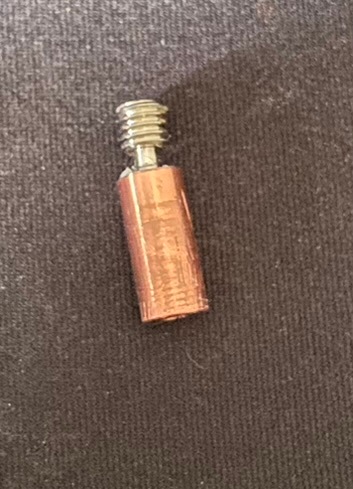
I tried printing with it as-is, but the filament came out too thin and at an angle, which made the print go about as well as you’d expect. I ordered a replacement, installed it, and… nothing worked still.
At this point I was getting thoroughly fed up. There seemed to be one problem after another, and no good way to diagnose problems with the print not sticking (because there are a dozen or so different potential causes). After a lot of frustrated googling, I found a post on the Prusa forums that suggested cleaning the build sheet with dish soap. I’d cleaned it with IPA, but several people were saying that dish soap magically fixed issues that IPA couldn’t. I took the plate to the kitchen, gave it a wash, and the next print went down perfectly.
Growing a backbone
For a blissful period of about four days the printer was chugging along perfectly with no issues. Then it started making a weird noise. In a display of amazing restraint, I didn’t immediately throw the whole thing out the window. Looking at the printer, I could see that the cable running from the extruder assembly to the main board was sagging and rubbing on top of the print as the print head was moving around. I’m not sure what property of the cable was keeping it aloft before, but it apparently ran out after about three weeks.
Like most of the other problems with the SV06, this design flaw has been noted by others and worked around. I printed a cable chain and installed it[6]. Amusingly, while I was printing the chain, the cable dragged on the print and dislodged one of the pieces entirely before it was finished. Fortunately, it didn’t affect the neighbouring pieces, so I just had to run off a replacement for that one.
The difference is rather pronounced:
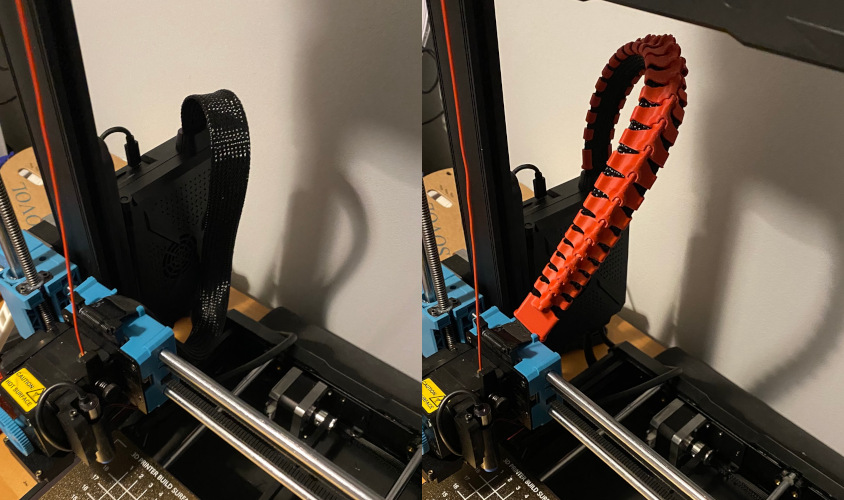
If you can’t see it: in the first image the cable is sagging and actually ends up below the print bed. The individual links of the cable chain limit its freedom of movement, stopping it sagging.
The end?
Once again the printer is printing properly again. I’m sure there will be more problems, but hopefully I get at least a week or so before anything else goes wrong. Maybe I’ll print an “X days since the last SV06 problem” counter…
I think, if I had to do this all again, but with the knowledge I have now, I’d have stumped up the extra cash to get a Prusa MK3S+[7]. This is the original machine on which the SV06 (and a lot of other cheap imitations) is based. Some obvious benefits it has over the SV06:
- The extruder cable runs on the outside of the machine, so won’t droop onto prints
- The heated bed has copper embedded in it for use in the induction sensor, so it won’t crash into the bed if the build sheet is removed
- They actually put lubricant in the bearings instead of shipping them bone dry
- The bed is held in place with screws instead of poorly sized aluminium spacers, so you can adjust the height without having to take the whole thing apart
- They don’t use the cheapest possible power supply and main board, so it doesn’t backpower off of USB devices or have the loudest fans known to mankind
Prusa also have a much better attitude towards 3D printing: they open source the hardware designs (which is why there are so many cheap clones), and they actually use the printers themselves. The plastic parts of an SV06 are injection moulded, but those on a Prusa printer are actually printed on a Prusa printer. Not only is it cool that they use their own products, it means they have to run them en-masse so they’re obviously invested in making them reliable. They also have a reputation for exceptional support.
Despite all the problems, I do enjoy having the printer. I’ll probably talk more about the prints I’ve done that weren’t for the 3D printer itself in the future.
-
The RRP is £279.99, Amazon discounted it down to £269.99 then offered a £70 voucher. The voucher says it expires at midnight, but it’s said that every day for the past three weeks… ↩︎
-
Which is exactly what another set of people said would happen. It was worth a try, though. ↩︎
-
This feels strange, but if you work out the areas of the nozzles it makes sense: a 0.4mm diameter nozzle has an area of 0.04πmm² (the radius is half the diameter, and the area of a circle is πr²), and a 0.6mm diameter nozzle has an area of 0.09πmm². Maths! ↩︎
-
At least it doesn’t eject the SD card across the room like this Ender 3 V2! ↩︎
-
My only 3D printer related injury so far. It’s impressive I can be around a 200 degree hot-end and somehow burn myself on a storage device. ↩︎
-
Well actually I printed 5 copies of their calibration piece until it was perfect, then printed the actual cable chain, then had to sand each of the individual links because they still weren’t good enough. God, I hate sanding. ↩︎
-
Or maybe I’d cave and get the newer, shinier, much more expensive MK4. That wouldn’t be out of character. No, I didn’t just check my bank balance. You’re imagining things. ↩︎